Renovation Planning & Costs
Home Renovation Checklist for Dubai Properties
A simple checklist to prepare before speaking with a renovation contractor in Dubai.
Renovator advice
Want help with this project?
Share your space and goals with Renovator on WhatsApp.
Why a Checklist Matters Before You Ask for a Quote
A renovation checklist is not paperwork for the sake of paperwork. It helps you explain the project clearly, compare quotes fairly, and avoid decisions being made too late. Renovation companies can give better guidance when they understand the property type, current condition, must-have work, optional upgrades, access rules, timeline, and budget priorities. Without that information, the first conversation often becomes too general and the estimate may not reflect the real project.
Dubai renovations involve practical conditions that homeowners sometimes forget until work is about to start. Apartment buildings may require service lift booking, common-area protection, work-hour compliance, and waste removal planning. Villas may need more sequencing because work areas are larger and more trades are involved. Occupied homes need dust control, furniture protection, and room-by-room planning. Rental properties may require landlord approval. Community rules or building management approvals can affect when work can begin.
Use this checklist before speaking with a contractor. You do not need perfect drawings or professional measurements. The goal is to prepare enough information for a useful first estimate and a better site visit.
Use this checklist with the complete guide to home renovation in Dubai when you are moving from general planning into a quote-ready scope.
1. Define the Purpose of the Renovation
Start by writing one clear sentence about why you are renovating. Examples include: “We are preparing the apartment before moving in,” “We need to renovate two bathrooms because of leaks and old tiles,” “We want a custom media wall and painting for the living room,” or “We are upgrading the kitchen to improve storage and appearance.” This simple sentence helps keep the project focused.
Then decide the property goal. Are you renovating for personal comfort, rental income, resale value, move-in readiness, or repair? Personal homes can justify more custom details because the family will use them every day. Rental homes need durable, neutral, easy-maintenance finishes. Resale projects should focus on broad appeal and visible quality. Repair projects should prioritize hidden issues such as waterproofing, plumbing, electrical safety, and wall damage.
If several people are involved in the decision, agree on the purpose before requesting prices. Conflicting goals create confusing scopes. One person may want premium finishes while another wants a fast rental refresh. A contractor can help with options, but the owner should define the main direction.
2. Walk Through the Property Room by Room
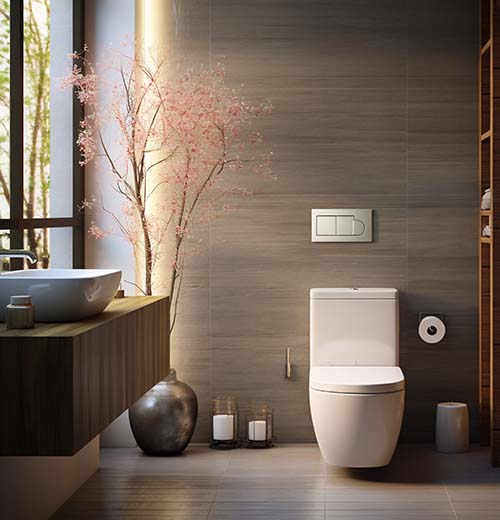
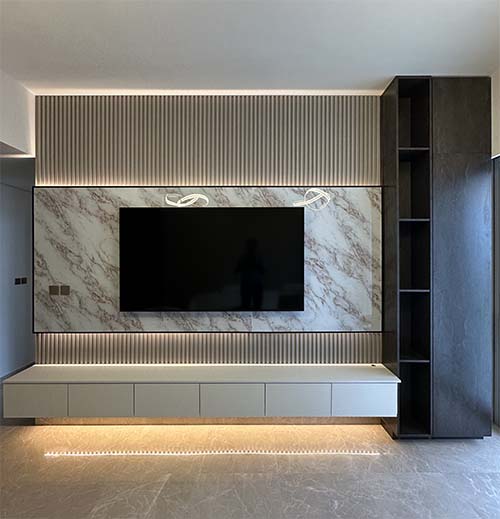
Do not describe the renovation only as “full home” or “apartment upgrade.” Walk through each room and write what needs to happen. For the kitchen, note whether cabinets, countertop, backsplash, appliances, plumbing, electrical points, lighting, or flooring need attention. For bathrooms, note leaks, tile condition, drainage, shower area, vanity, fixtures, ventilation, lighting, and storage. For living rooms, note painting, media wall, wall paneling, lighting, storage, or TV cable problems.
Bedrooms may need painting, wardrobes, headboard walls, lighting, curtain tracks, or minor repairs. Corridors may need painting, feature walls, or lighting improvements. Balconies and utility areas may need surface repair, waterproofing checks, or storage. Entrance areas may need a console, shoe storage, feature wall, or stronger lighting.
This room-by-room list helps you see whether the project is a light refresh, a medium renovation, or a larger multi-trade scope. It also helps the contractor identify which trades are required and which work should happen first.
3. Separate Must-Haves From Nice-to-Haves
Create two lists. The must-have list includes issues that affect safety, function, water damage, daily use, or the core purpose of the renovation. Examples include bathroom waterproofing, plumbing repairs, damaged tiles, broken cabinetry, poor lighting, wall cracks, moisture treatment, and a kitchen layout that no longer works. These items should not be removed just to make room for decorative upgrades.
The nice-to-have list includes upgrades that improve appearance or comfort but can be simplified, phased, or adjusted. Examples include premium wall paneling, extra LED lighting, decorative shelves, upgraded handles, stone-look surfaces, high-end mirrors, special paint effects, or more expensive accessories. These items are valuable, but they are flexible.
This separation makes budget conversations easier. If the estimate is higher than expected, you can reduce optional items without weakening the technical quality of the renovation. It also helps Renovator recommend smarter alternatives rather than guessing what matters most.
4. Take Useful Photos and Measurements
Photos are one of the most helpful things you can send before a site visit. Take wide shots of each room from multiple corners, then close-ups of problem areas. For kitchens, photograph the full cabinet run, sink, countertop, backsplash, appliances, ceiling, and any damaged areas. For bathrooms, photograph the shower, drain, vanity, toilet, ceiling, floor, silicone, and any signs of leakage or moisture. For media walls and feature walls, take a straight-on photo and a side photo showing depth and furniture.
Measurements do not need to be perfect at this stage, but rough dimensions help. Measure wall width and height for media walls or paneling. Measure kitchen length if possible. Note bathroom size if you know it. For appliances, record width and height if they need to be integrated into cabinetry. For TVs, note screen size and whether you plan to upgrade.
Good photos and rough measurements allow the first estimate to be more realistic. They also help the contractor identify questions before visiting, saving time for both sides.
5. Check Building, Community, or Landlord Rules
Before work starts, check whether approvals are required. Apartment buildings may have renovation forms, contractor registration requirements, refundable deposits, work-hour rules, service lift booking, parking restrictions, and disposal rules. Villas and townhouses may have community guidelines, especially for exterior work or noisy activities. Tenants should check landlord approval before making changes.
These rules can affect timeline and cost. If access is restricted, deliveries and disposal must be planned more carefully. If work can happen only during specific hours, the schedule may be longer. If common areas need protection, that should be included in planning. If approvals are delayed, the start date may move.
Do not leave approvals until the day work is supposed to begin. Ask building management early and share the requirements with the contractor. This reduces the risk of delays after materials and labor have already been scheduled.
6. Decide Whether You Will Live in the Property
Occupied renovations require different planning from vacant renovations. If you live in the property, the team needs to think about dust control, furniture protection, room access, bathroom availability, kitchen downtime, noise, and daily cleaning. Some work may need to be phased so parts of the home remain usable. This can make the timeline longer but more comfortable.
Vacant homes are usually easier to renovate because the team can work across multiple areas without protecting daily living routines. However, vacant homes still need security, access, approvals, power, water, and material storage. If you are renovating before move-in, allow time after handover for final cleaning, furniture delivery, curtains, appliances, and snagging.
Tell the contractor honestly whether the home is occupied. Underestimating disruption creates frustration. A good renovation plan can reduce inconvenience, but only if the condition is known from the beginning.
7. Prepare Your Budget Priorities
You do not always need to share an exact budget immediately, but it helps to know your priorities. Decide where you are willing to invest and where you prefer to keep things simple. For example, you may prioritize bathroom waterproofing, kitchen storage, and a media wall, while keeping bedroom painting simple. Or you may prioritize a rental-ready refresh with durable paint and practical repairs instead of premium finishes.
If you have a target range, share it as a planning guide. A responsible contractor can then explain whether the desired scope fits, what should be adjusted, and which items are driving the cost. If the budget is not realistic for the full wishlist, it is better to know early than after design decisions have been made.
You can also use the home renovation cost calculator before contacting Renovator, then send the estimate summary with your must-have and nice-to-have list.
Budget planning should protect technical work first. Do not reduce waterproofing, electrical safety, wall preparation, or proper installation just to afford a more decorative finish. Durable basics are what make the renovation last.
8. Gather Inspiration Images Carefully
Inspiration images are useful, but they should be used with explanation. Instead of sending ten images and asking for “this style,” explain what you like: the cabinet color, lighting, wall texture, TV placement, storage idea, tile size, vanity shape, or overall mood. This helps the contractor adapt the idea to your actual property.
Remember that inspiration images often show larger rooms, different ceiling heights, professional lighting, and expensive materials. The design may need to be simplified for a Dubai apartment or adjusted for a villa wall. A good renovation team can keep the feeling of the inspiration while making it practical for your space, budget, and maintenance needs.
9. Ask the Right Contractor Questions
Before approving a quote, ask what is included, what is excluded, which materials are proposed, how long the work may take, how variations are handled, and what the handover process includes. For bathrooms, ask about waterproofing and drainage. For kitchens, ask about cabinet material, hardware, countertop, and appliance coordination. For media walls, ask about cable management, ventilation, and access. For painting, ask about wall preparation and number of coats.
Also ask what information is needed from you and by when. Renovation delays often happen because tiles, fixtures, appliances, paint colors, handles, or lighting decisions are made too late. A clear decision schedule helps the contractor plan procurement and installation.
10. Prepare for Handover
Before work begins, understand how the final handover will be checked. A good handover should include inspection of visible finishes, operation of drawers and doors, lighting tests, fixture checks, silicone and paint touch-ups, drainage checks where relevant, and a review of any remaining snagging items. For bathrooms, check leaks, drainage, fixtures, and ventilation. For kitchens, check cabinet alignment, countertop joints, sink, mixer, appliance fit, and lighting. For media walls, check TV position, cable access, lighting, storage, and finish quality.
Keep a simple snagging list rather than relying on memory. Small items are normal in renovation, but they should be documented and closed properly. This final step is part of the project, not an afterthought.
What to Send Renovator
When you are ready, send Renovator photos, rough measurements, property location, building type, occupancy status, preferred timeline, must-have list, nice-to-have list, and inspiration images. Mention any urgent issues such as leakage, damaged walls, poor ventilation, old wiring, or broken cabinetry. With that information, Renovator can guide you toward the right service scope and the next step.
Checklist Summary Before You Press Send
Before contacting a renovation company, review your notes one final time. You should know which rooms are included, which problems must be repaired, which upgrades are optional, whether the home is occupied, what approvals may be needed, and what timeline you prefer. You should also have enough photos for the contractor to understand the current condition. A short but organized message often produces a better first response than a long unclear description.
For a kitchen, include appliance details and whether the layout should stay the same. For a bathroom, include leakage, drainage, ventilation, and fixture notes. For media walls and wall paneling, include wall dimensions, TV size, storage needs, and lighting preferences. For painting, mention whether the walls are damaged, whether the property is furnished, and whether it is a move-in or move-out job.
This preparation does not replace a site visit, but it makes the site visit more productive. The contractor can arrive with better questions, spot risks faster, and recommend a scope that matches your priorities. It also gives you more confidence because you are not starting the conversation from a vague idea. You are starting with a practical renovation brief.
Related services
Renovation Services in Dubai
Explore Renovator's core services for media walls, kitchen renovation, bathroom renovation, wall paneling, painting, and full-space upgrades.
Renovator advice
Ready to plan your renovation?
Send us photos of your space on WhatsApp and our team will guide you on the next steps.